티스토리 뷰
MFC 이미지 회전시키기(45도)
오늘은 MFC를 가지고
이미지를 원하는 각도로 회전시키는 예제를 만들어 보겠습니다~!
[결과 사진]
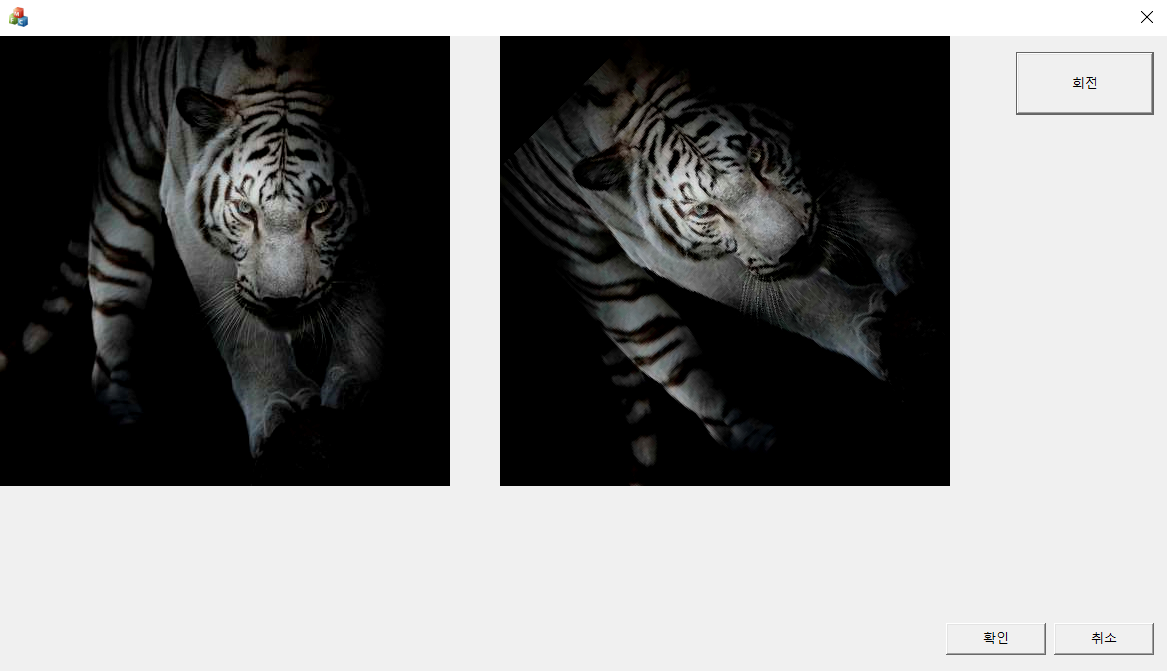
위의 결과는 왼쪽으로 45도 회전시킨 사진입니다.
[코드 설명]
먼저 앞선 예제들처럼
원본 이미지를 출력시키기 위해
헤더파일의 Dlg.h파일에 가셔서
CImage 변수 m_image를 추가시켜 주시고
두 번째로 회전된 이미지를 저장하고 출력시키기 위해
변수 m_two_image를 하나 더 선언해 줍니다.
m_image에는 원본 이미지
m_two_image에는 회전된 이미지를 저장시켜줄 것입니다.
|
private:
CImage m_image;
CImage m_two_image;
|
cs |
소스코드 Dlg.cpp 파일에
OnInitDialog() 함수가 있는 곳으로 이동해줍니다.
아래와 같이 원본 이미지 변수에 외부 이미지를 로드시켜주는 코드와
회전된 이미지를 저장시켜줄 공간을 create 해주는 코드를 추가시켜줍니다.
m_image.GetWidth(), m_image.GetHeight() 는 원본 이미지의 가로 픽셀과 세로 픽셀의 길이를 가져오는 함수입니다.
|
BOOL CRotateExamDlg::OnInitDialog()
{
CDialogEx::OnInitDialog();
SetIcon(m_hIcon, TRUE);
SetIcon(m_hIcon, FALSE);
m_image.Load(L"test1.bmp");
m_two_image.Create(m_image.GetWidth(), m_image.GetHeight(), m_image.GetBPP(), 0);
return TRUE;
}
|
cs |
다음 OnPaint() 함수로 가셔서
이미지를 그려주기 위해
아래와 같이 코드를 바꾸어줍니다.
|
void CRotateExamDlg::OnPaint()
{
CPaintDC dc(this); // 그리기를 위한 디바이스 컨텍스트입니다.
if (IsIconic())
{
SendMessage(WM_ICONERASEBKGND, reinterpret_cast<WPARAM>(dc.GetSafeHdc()), 0);
int cxIcon = GetSystemMetrics(SM_CXICON);
int cyIcon = GetSystemMetrics(SM_CYICON);
CRect rect;
GetClientRect(&rect);
int x = (rect.Width() - cxIcon + 1) / 2;
int y = (rect.Height() - cyIcon + 1) / 2;
dc.DrawIcon(x, y, m_hIcon);
}
else
{
m_image.Draw(dc, 0, 0);
//CDialogEx::OnPaint();
}
}
|
cs |
마지막으로 리소스 뷰에
다이얼로그 창에서 버튼 하나를 추가시켜주신 후
버튼을 더블클릭하면 아래와 같이 함수가 하나 만들어지는데
그 함수 안에 아래의 코드를 추가시켜줍니다~!
|
void CRotateExamDlg::OnBnClickedFindBtn2()
{
CClientDC dc(this);
int h = m_image.GetHeight(); // 세로 길이 저장
int w = m_image.GetWidth(); // 가로 길이 저장
int degree = 45; // 회전 각도
int new_x, new_y;
int R, G, B;
int center_x = (m_image.GetWidth() / 2); // 회전 중심점
int center_y = (m_image.GetHeight() / 2); // 회전 중심점
double seta = 3.14 / (180.0 / degree); // 라디안
for (int y = 0; y < h; y++)
{
for (int x = 0; x < w; x++) {
new_x = (int)((x - center_x) * cos(seta) + (y - center_y) * sin(seta) + center_x);
new_y = (int)(-(x - center_x) * sin(seta) + (y - center_y) * cos(seta) + center_y);
if (new_x < 0 || (new_x >= w) || (new_y < 0) || (new_y >= h))
continue;
else
{
R = GetRValue(m_image.GetPixel(x, y));
G = GetGValue(m_image.GetPixel(x, y));
B = GetBValue(m_image.GetPixel(x, y));
}
m_two_image.SetPixel(new_x, new_y, RGB(R, G, B));
new_x = 0; new_y = 0;
}
}
for (int y = 0; y < h; y++)
{
for (int x = 0; x < w; x++)
{
new_x = (int)((x - center_x) * cos(seta) - (y - center_y) * sin(seta) + center_x);
new_y = (int)((x - center_x) * sin(seta) + (y - center_y) * cos(seta) + center_y);
if ((new_x < 0) || (new_x >= w) || (new_y < 0) || (new_y >= h))
//이미지 범위를 벗어나면 0 값
{
R = 0;
G = 0;
B = 0;
}
else
{
R = GetRValue(m_image.GetPixel(new_x, new_y));
G = GetGValue(m_image.GetPixel(new_x, new_y));
B = GetBValue(m_image.GetPixel(new_x, new_y));
}
m_two_image.SetPixel((int)x, (int)y, RGB(R, G, B));
new_x = 0; new_y = 0;
}
}
m_two_image.Draw(dc, 500, 0); // 새로운 그림 그려준다.
}
|
cs |
그럼 왼쪽에는 원본 이미지가 출력되고
오른쪽에는 45도 회전된 이미지가 출력되게 됩니다.
이미지의 회전 각도는 바로 위의 코드에서
변수 degree를 원하는 각도로 수정해서 실행시켜주시면 됩니다~!! :)
'프로그래밍 > MFC 프로그래밍' 카테고리의 다른 글
| [MFC C++] - 열감지 이미지 만들어보기 (0) | 2020.01.21 |
|---|---|
| [MFC C++] 이미지 RGB 분리 (2) | 2020.01.19 |
| MFC 이미지 색반전 (Invert color image) (1) | 2020.01.14 |
| MFC 픽셀값 사용해서 이미지 확대 시키기 (0) | 2020.01.13 |
| MFC 이미지 회전 시키기 (0) | 2020.01.10 |